Dockerfile构建镜像(示例)
如何编写和使用 Dockerfile ?
一、编写Dockrfile文件
创建两个简单的 Dockerfile 文件:
~/build-images/
├── hello-zxzsk.com
│   └── Dockerfile
└── nginx
    ├── Dockerfile
    └── html
        └── index.html
1.1 HelloWorld 镜像
cat ~/build-images/hello-zxzsk.com/Dockerfile
# 使用官方 Alpine 镜像作为基础镜像(非常轻量)
FROM alpine:latest

# 设置容器启动时运行的命令
CMD echo "Hello, World!"
在这个示例中,我们使用 alpine:latest 作为基础镜像,容器启动时执行 echo "hello, world!"
1.2 Nginx 镜像
cat ~/build-images/nginx/Dockerfile
# 使用官方 Nginx 镜像作为基础镜像
FROM nginx:latest

# 设置元数据(可选)
LABEL maintainer="yourname@example.com"

# 删除默认的 Nginx 欢迎页面
RUN rm /usr/share/nginx/html/index.html

# 将本地的静态文件复制到 Nginx 的默认网站目录
COPY ./html /usr/share/nginx/html

# 暴露 80 端口
EXPOSE 80

# 启动 Nginx
CMD ["nginx", "-g", "daemon off;"]
在这个示例中我们使用 nginx:latest 作为基础镜像,用本地目录覆盖 nginx:latest 镜像的网站目录,形成新的镜像。
~/build-images/nginx/html/index.html
<!DOCTYPE html>
<html lang="zh-CN">
<head>
<meta charset="UTF-8">
<meta name="viewport" content="width=device-width, initial-scale=1.0">
<title>欢迎来到我的网站</title>
<style>
body {
font-family: Arial, sans-serif;
background-color: #f0f0f0;
margin: 0;
padding: 0;
display: flex;
justify-content: center;
align-items: center;
height: 100vh;
}
.container {
text-align: center;
background-color: #ffffff;
padding: 20px;
border-radius: 10px;
box-shadow: 0 0 10px rgba(0, 0, 0, 0.1);
}
h1 {
color: #333333;
}
p {
color: #666666;
}
a {
color: #007BFF;
text-decoration: none;
}
a:hover {
text-decoration: underline;
}
</style>
</head>
<body>
<div class="container">
<h1>欢迎来到我的网站!</h1>
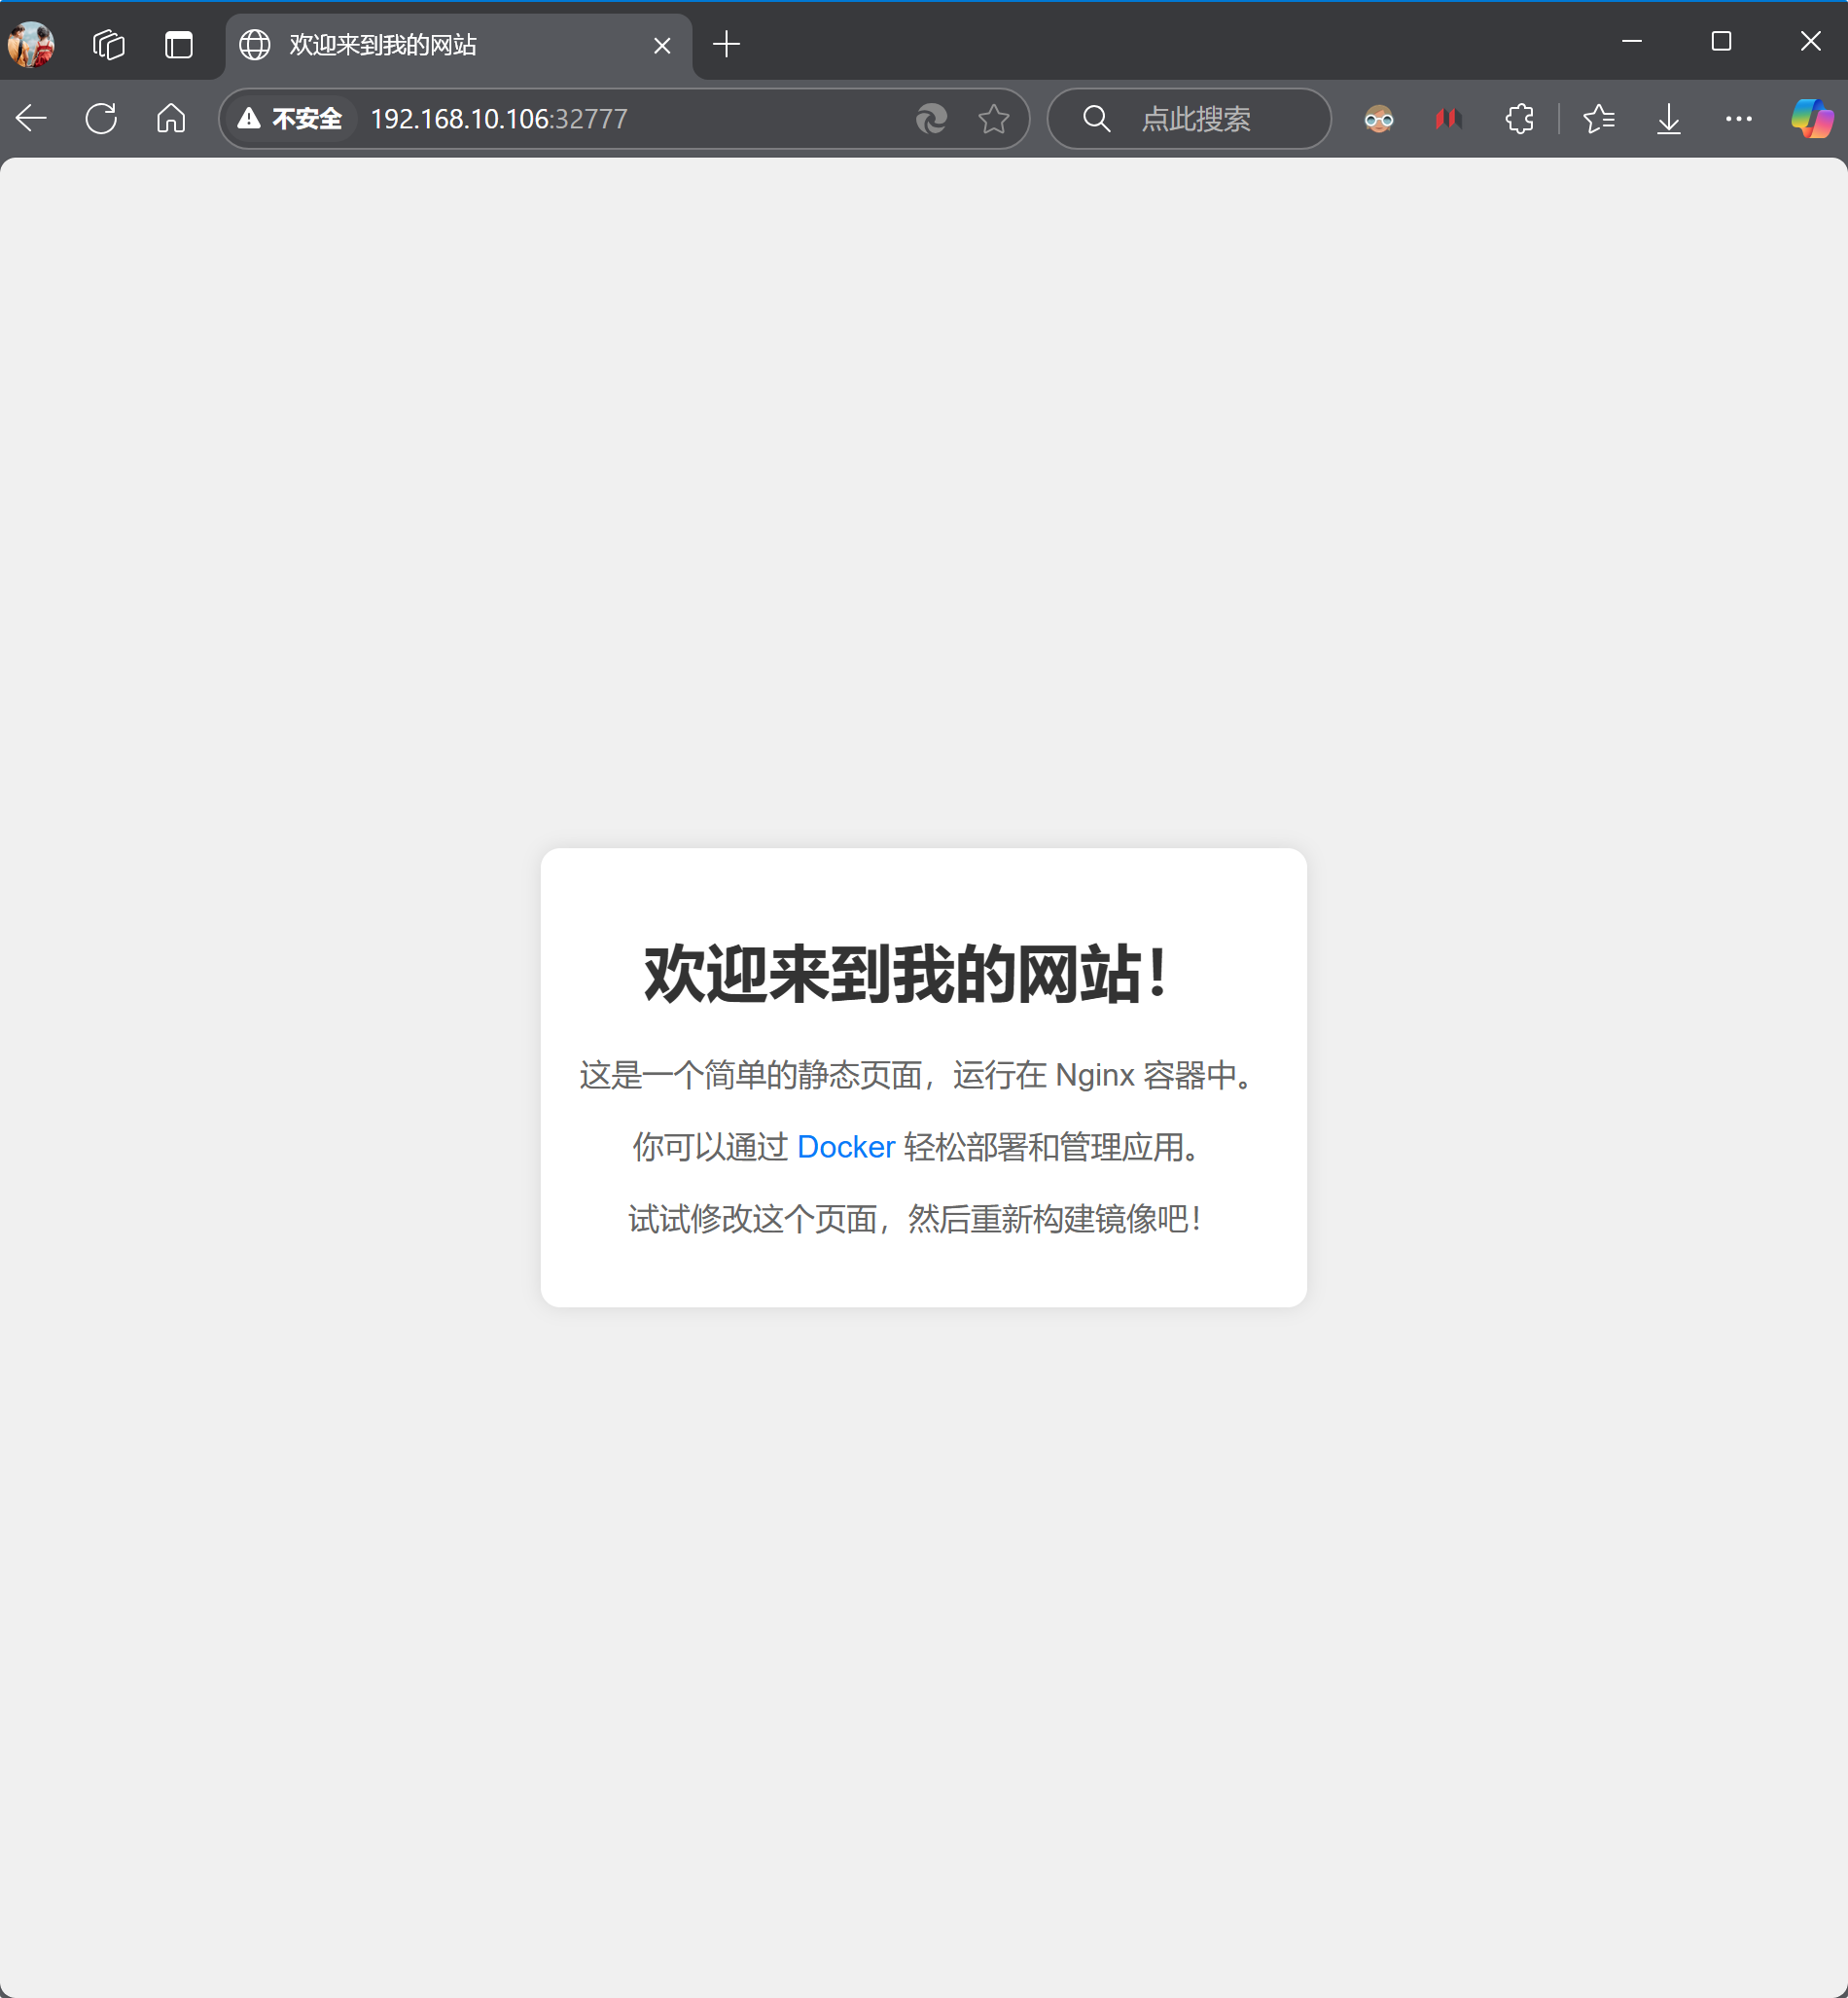
<p>这是一个简单的静态页面,运行在 Nginx 容器中。</p>
<p>你可以通过 <a href="https://www.docker.com/" target="_blank">Docker</a> 轻松部署和管理应用。</p>
<p>试试修改这个页面,然后重新构建镜像吧!</p>
</div>
</body>
</html>
二、使用 Dockerfile 构建镜像
确认准备好这些文件
~/build-images/
├── hello-zxzsk.com
│   └── Dockerfile
└── nginx
    ├── Dockerfile
    └── html
        └── index.html
构建 hello world 镜像:
# 构建之前(3个)
ubuntu@zxzsk.com:~$ docker images
REPOSITORY       TAG       IMAGE ID       CREATED          SIZE
nginx            latest    b52e0b094bc0   2 weeks ago      192MB
mysql            latest    5568fddd4f66   4 weeks ago      797MB
ubuntu           20.04     6013ae1a63c2   4 months ago     72.8MB

# 开始构建
ubuntu@zxzsk.com:~$ docker build -t my-hello-world:0.1 build-images/hello-zxzsk.com/
DEPRECATED: The legacy builder is deprecated and will be removed in a future release.            Install the buildx component to build images with BuildKit:
            https://docs.docker.com/go/buildx/

Sending build context to Docker daemon  2.048kB
Step 1/2 : FROM alpine:latest
latest: Pulling from library/alpine
f18232174bc9: Pull complete
Digest: sha256:a8560b36e8b8210634f77d9f7f9efd7ffa463e380b75e2e74aff4511df3ef88c
Status: Downloaded newer image for alpine:latest
 ---> aded1e1a5b37
Step 2/2 : CMD echo "Hello, World! Hello, zxzsk.com!"
 ---> Running in 1817379797b2
 ---> Removed intermediate container 1817379797b2
 ---> f7688e36afea
Successfully built f7688e36afea
Successfully tagged my-hello-world:0.1

# 构建之后(5个)
ubuntu@zxzsk.com:~$ docker images
REPOSITORY       TAG       IMAGE ID       CREATED          SIZE
my-hello-world   0.1       f7688e36afea   12 seconds ago   7.83MB
alpine           latest    aded1e1a5b37   11 days ago      7.83MB
nginx            latest    b52e0b094bc0   2 weeks ago      192MB
mysql            latest    5568fddd4f66   4 weeks ago      797MB
ubuntu           20.04     6013ae1a63c2   4 months ago     72.8MB
由于使用 appine 作为底层镜像,在构建过程中也会下载 alpine 镜像。
构建 nginx 镜像:
# 构建之前(5个)
ubuntu@zxzsk.com:~$ docker images
REPOSITORY       TAG       IMAGE ID       CREATED          SIZE
my-hello-world   0.1       f7688e36afea   15 minutes ago   7.83MB
alpine           latest    aded1e1a5b37   11 days ago      7.83MB
nginx            latest    b52e0b094bc0   2 weeks ago      192MB
mysql            latest    5568fddd4f66   4 weeks ago      797MB
ubuntu           20.04     6013ae1a63c2   4 months ago     72.8MB

# 开始构建
ubuntu@zxzsk.com:~$ docker build -t my-nginx:latest build-images/nginx/
DEPRECATED: The legacy builder is deprecated and will be removed in a future release.            Install the buildx component to build images with BuildKit:
            https://docs.docker.com/go/buildx/

Sending build context to Docker daemon  4.608kB
Step 1/6 : FROM nginx:latest
 ---> b52e0b094bc0
Step 2/6 : LABEL maintainer="yourname@example.com"
 ---> Running in 13f16ae0c378
 ---> Removed intermediate container 13f16ae0c378
 ---> c148c24c10f3
Step 3/6 : RUN rm /usr/share/nginx/html/index.html
 ---> Running in 97d5f9cc586e
 ---> Removed intermediate container 97d5f9cc586e
 ---> f74862837238
Step 4/6 : COPY ./html /usr/share/nginx/html
 ---> 700cdb525376
Step 5/6 : EXPOSE 80
 ---> Running in 429e1e1174cf
 ---> Removed intermediate container 429e1e1174cf
 ---> 507843d7d224
Step 6/6 : CMD ["nginx", "-g", "daemon off;"]
 ---> Running in 6cc5d230d2e4
 ---> Removed intermediate container 6cc5d230d2e4
 ---> 0809827f6f41
Successfully built 0809827f6f41
Successfully tagged my-nginx:latest

# 构建之后(6个)
ubuntu@zxzsk.com:~$ docker images
REPOSITORY       TAG       IMAGE ID       CREATED          SIZE
my-nginx         latest    0809827f6f41   7 seconds ago    192MB
my-hello-world   0.1       f7688e36afea   15 minutes ago   7.83MB
alpine           latest    aded1e1a5b37   11 days ago      7.83MB
nginx            latest    b52e0b094bc0   2 weeks ago      192MB
mysql            latest    5568fddd4f66   4 weeks ago      797MB
ubuntu           20.04     6013ae1a63c2   4 months ago     72.8MB
三、部署镜像
部署刚才通过 Dockerfile 构建的两个镜像。
ubuntu@zxzsk.com:~$ docker ps -a
CONTAINER ID   IMAGE                COMMAND                   CREATED          STATUS                      PORTS                                     NAMES

ubuntu@zxzsk.com:~$ docker run my-hello-world:0.1
# 第一个容器输出
Hello, World! Hello, zxzsk.com!

# 第二个容器要在浏览器中查看效果
ubuntu@zxzsk.com:~$ docker run -d -P --restart always my-nginx
5f9cfbdba6a083ca1d69427912d199d6883a6612356d16a3a796e7701677ad23

ubuntu@zxzsk.com:~$ docker ps -a
CONTAINER ID   IMAGE                COMMAND                   CREATED          STATUS                      PORTS                                     NAMES
3a296b0470cb   my-hello-world:0.1   "/bin/sh -c 'echo \"H…"   49 seconds ago   Exited (0) 49 seconds ago                                             fervent_lewin
5f9cfbdba6a0   my-nginx             "/docker-entrypoint.…"    2 minutes ago    Up 2 minutes                0.0.0.0:32777->80/tcp, :::32777->80/tcp   musing_dijkstra
浏览器访问 my-nginx 容器。
许多网站开发者通过 Dockerfile 将网站文件和依赖(nginx服务)打包成镜像。这样在任何电脑上都能通过 Docker 轻松部署网站。
例:reference
docker run -d -P --restart always wcjiang/reference
四、Dockerfile 的基本结构
一个典型的 Dockerfile 包含以下部分:
- 基础镜像:使用
FROM指令指定基础镜像。 - 元数据:使用
LABEL指令添加镜像的元数据(如作者、版本等)。 - 环境设置:使用
ENV指令设置环境变量。 - 依赖安装:使用
RUN指令安装软件包或运行命令。 - 文件复制:使用
COPY或ADD指令将文件从主机复制到镜像中。 - 工作目录:使用
WORKDIR指令设置工作目录。 - 暴露端口:使用
EXPOSE指令声明容器运行时监听的端口。 - 启动命令:使用
CMD或ENTRYPOINT指令指定容器启动时运行的命令。
五、Dockerfile 常用指令
| 指令 | 说明 |
|---|---|
FROM | 指定基础镜像,必须是 Dockerfile 的第一条指令(除了注释)。 |
LABEL | 为镜像添加元数据,例如作者、版本等信息。 |
RUN | 在镜像中执行命令,通常用于安装软件包或运行脚本。 |
COPY | 将文件或目录从主机复制到镜像中。 |
ADD | 类似于 COPY,但支持自动解压 tar 文件和从 URL 下载文件。 |
WORKDIR | 设置工作目录,后续的指令都会在这个目录下执行。 |
ENV | 设置环境变量。 |
ARG | 定义构建时的变量,仅在构建过程中有效。 |
EXPOSE | 声明容器运行时监听的端口。 |
CMD | 指定容器启动时默认执行的命令(可以被 docker run 覆盖)。 |
ENTRYPOINT | 指定容器启动时的主要命令(通常与 CMD 结合使用)。 |
VOLUME | 定义匿名卷或挂载点,用于持久化数据。 |
USER | 指定运行后续指令的用户(默认为 root)。 |
HEALTHCHECK | 定义容器的健康检查命令。 |
ONBUILD | 定义触发器,当该镜像作为其他镜像的基础镜像时触发。 |
六、docker build -t 命令
docker build -t my-python-app:latest .
-t:指定镜像的名称和标签。.:指定 Dockerfile 所在的路径(当前目录)。
通过 Dockerfile,你可以轻松定义和自动化镜像的构建过程,确保开发、测试和生产环境的一致性。